Unlock Efficiency: integrating with salesforce to streamline your sales process
Discover how integrating with salesforce can streamline your sales workflow with practical steps to connect tools and maintain data integrity.
Connecting your prospecting tools directly to your Salesforce instance is one of those non-negotiable steps for any modern sales team. It’s how you eliminate mind-numbing manual data entry, slam the door on duplicate records, and keep your data clean by automating lead and contact creation.
The entire point is to turn raw prospecting activity into clean, actionable CRM data without all the usual friction.
Why Integrating with Salesforce Is a Game Changer
Let’s be real—manual data entry is where sales productivity goes to die. SDRs and Account Execs spend a shocking amount of time toggling between their inbox, prospecting tools, and Salesforce, just copying and pasting information. This isn't just a time-sink; it's a direct drain on active selling time and the number one cause of data errors that wreck your forecasting.
A disconnected workflow is a recipe for chaos. Critical information gets lost in transit, records are outdated the second they’re created, and sales leaders are left trying to make strategic calls with half-baked, inaccurate data. This is the painful reality for too many teams that haven't streamlined their tech stack.
The True Cost of a Disconnected System
The damage from a fragmented process goes way beyond just a few wasted minutes here and there. When your tools don't talk to each other, you create some serious business headaches.
- Inaccurate Pipeline Reporting: Manual entry is riddled with typos, skipped fields, and duplicate opportunities. Good luck trusting your pipeline when the data is a mess.
- Lost Sales Opportunities: That hot lead someone found on a prospecting site? If adding it to Salesforce is a pain, it might never make it in. That means no follow-up and zero revenue.
- Reduced Team Morale: Nothing burns out a skilled salesperson faster than forcing them to do hours of repetitive, low-value admin work.
This is exactly where integrating a tool like Add to CRM with Salesforce changes everything. Instead of accepting data entry as a necessary evil, you just automate it away.
By connecting your prospecting tools directly to Salesforce, you establish a single source of truth. This empowers your sales team to stop managing data and start doing what they do best: building relationships and closing deals.
Shifting from Manual Labor to Automated Workflows
The real magic of a solid integration is the shift from reactive data cleanup to proactive, clean data creation. An SDR can find a promising prospect, click a single button, and instantly push a clean, enriched record into Salesforce without ever leaving their browser tab. This isn't just about saving time—it’s about fundamentally improving the quality and speed of your entire sales motion.
This shift directly fuels your most important business goals:
- Accelerated Sales Velocity: Leads get into the CRM faster, which means follow-up happens sooner.
- Enhanced Data Integrity: With automated mapping and duplicate checks, your CRM stays reliable and trustworthy.
- Improved Sales Performance: More time spent on actual selling inevitably leads to higher conversion rates.
At the end of the day, a proper Salesforce integration is about building a scalable, efficient sales machine. To dive deeper, you can learn more about boosting efficiency in sales in our detailed guide.
How to Prepare Your Salesforce Org for a Smooth Integration
Trying to connect a new tool to Salesforce without prepping your org first is a recipe for disaster. Think of it like building a house on a shaky foundation—it’s just asking for problems down the road. Taking a few minutes to get your Salesforce instance ready is the single most important step for a smooth, secure, and successful integration. This prep work heads off the most common (and totally avoidable) roadblocks before they ever happen.
First up, check your Salesforce Edition. Not all versions are built the same, and this can be a deal-breaker for connecting external apps. Editions like Professional, for example, often have API access disabled by default, which will stop an integration dead in its tracks. A quick check here saves you from hours of troubleshooting a connection that was never going to work in the first place.
Nail Down Your User Permissions and Profiles
Once you've confirmed you have API access, it's time to look at user permissions. The goal is to grant the connecting user just enough access to do its job, and not an ounce more. This is called the principle of least privilege, and it's your best friend for keeping your org secure.
For a tool like Add to CRM to work correctly, the user profile you use for the connection needs a few specific permissions:
- API Enabled: This is the main switch. If it's off, nothing else matters. The user account must be able to interact with Salesforce through its API.
- Modify All Data: This is optional but highly recommended for the admin setting things up. It ensures you can manage all the records and settings needed for the integration. For regular users, you'll want to get more granular with object-level permissions (Create, Read, Update).
- View and Manage Users: This is handy for admins who need to see how the integration is being used across different teams.
It’s like giving a hotel guest a keycard that only opens their room and the gym—not every single room in the building. You give exactly what's needed and nothing more.
A well-configured permission set is the bedrock of a secure and functional integration. It ensures that data flows correctly without exposing your Salesforce environment to unnecessary risks.
Get Your Data Governance Strategy in Order
With over 150,000 companies trusting Salesforce as their CRM, data quality is a massive, universal headache. The platform has been the #1 CRM for 12 straight years, which means RevOps admins everywhere are constantly battling to keep their data clean. You can dig into how Salesforce continues to lead the CRM market on Girikon.com.
An integration tool can save your team over four hours a week on manual entry, but that's only true if the data coming in is clean to begin with. This is where data governance is so critical.
Before you connect anything new, give your org a quick data health check. Do you have thousands of duplicate leads or contacts already making a mess? An integration won't fix existing data problems; it will only make them worse.
Start by tackling what’s already there. A focused cleanup now prevents you from pouring a messy database into your brand-new, streamlined workflow. For a practical guide on cleaning house, check out our tutorial on how to merge duplicates in Salesforce. Do this prep work, and you'll be adding high-quality, reliable data that actually helps you grow—not just more noise.
With your Salesforce org prepped and ready, it's time to make the connection. This is often where folks get a little nervous, picturing complex code or confusing API settings. Don't worry. Modern tools have made integrating with Salesforce a simple, click-based process anyone can handle.
The goal here is to build a secure bridge between your prospecting workflow and your CRM, letting data flow automatically without you having to lift a finger. For a tool like Add to CRM, this whole process kicks off right in your browser.
Getting the Tool Installed
First things first, you need to add the tool to your workflow. You can install the Add to CRM extension straight from the Chrome Web Store. Once it's added, you'll see its icon pop up in your browser's toolbar—that's your new command center.

A quick click on that icon opens the settings panel where you'll manage your integrations. This is where you’ll find the option to connect to Salesforce.
How the Secure Connection Works (OAuth, Demystified)
When you hit the 'Connect to Salesforce' button, you're starting a process called OAuth 2.0. This is just a fancy, industry-standard way for apps to talk to each other securely without you ever sharing your actual password.
Think of it like giving a valet a key that only starts the car—it doesn’t open the glove box.
You aren't giving the extension your Salesforce username and password. Instead, you're granting it a specific, limited-access token that authorizes it to do certain things on your behalf, like create a new Lead. It's the same secure method that giants like Google and Meta use to connect their services.
The beauty of OAuth is its simplicity and security. You’ll click through a few standard Salesforce login and permission screens, and once you approve access, the connection is made. No copying and pasting sensitive API keys.
This codeless approach is what makes powerful integrations accessible to everyone on the sales team, not just the developers. If you're curious about the technical side of things, we have a guide on how to find and use API keys, but for this specific connection, everything is automated for you.
Making Sure the Connection is Solid
After you approve the access request from Salesforce, you’ll be sent right back to the Add to CRM settings page. You should see a clear confirmation that your Salesforce account is connected. A little green checkmark or a "Connected" status is all it takes to know the digital handshake is complete.
This confirms the token exchange worked and the extension is now authorized to talk to your Salesforce org. From here on out, you can start creating records in Salesforce with one click, directly from a prospect's profile.
So, what does a successful connection mean for your team?
- Instant Record Creation: Anyone on the team can now add Leads, Contacts, and Accounts to Salesforce in a single click. No more context switching.
- Real-Time Data Sync: The data hits Salesforce immediately, keeping your CRM perfectly in sync with your prospecting efforts.
- Zero Admin Headaches: The whole authentication process takes less than a minute and requires zero technical skill, empowering every user to manage their own connection.
This streamlined, no-code approach tears down the old barriers to software integration. It turns what used to be a daunting task into a simple setup step, letting your team focus on what actually drives revenue.


Find verified contact data on LinkedIn®
Add to CRM finds verified emails, phone numbers, and job titles on LinkedIn® — then adds them to your CRM in one click.
Start Free TrialMastering Custom Field Mapping for Flawless Data Syncing
A successful connection is just the starting line. The real power of integrating your tools with Salesforce comes from what you do next: telling your data exactly where to go.
This process, known as field mapping, is where you lay down the rules. It's how you ensure every piece of information your team finds—from a job title to a specific buying signal—flows from your prospecting tool into the correct fields within your Salesforce objects. Skip this, and you're just dumping raw, unstructured data into your CRM, creating a cleanup nightmare for your RevOps team later.
Proper field mapping is the difference between a cluttered, unreliable CRM and a pristine, actionable database. It’s how you guarantee that a prospect’s job title, company size, and industry land in the exact right spot on a Lead or Contact record. Every. Single. Time.
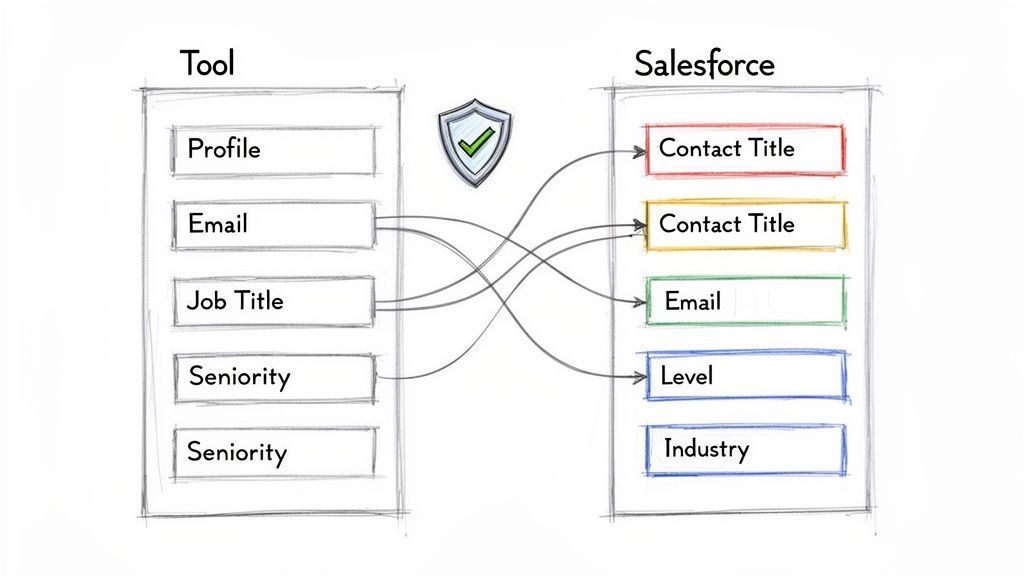
Why Standard Field Mapping Is Not Enough
Most tools handle the basics, mapping standard fields like FirstName, LastName, and Email. While that's essential, it’s just scratching the surface. Your Salesforce org is unique, full of custom fields that capture the specific data your sales team needs to qualify leads and close deals.
This is where custom field mapping becomes a non-negotiable. It’s the bridge between the rich data you find during prospecting and the unique architecture of your Salesforce instance.
Let’s say your team tracks a prospect's seniority level in a custom picklist field called "Level" with values like "C-Suite," "VP," or "Director." With custom mapping, you can directly link the "Seniority" data point from a tool like Add to CRM to this specific field, making sure every new record is properly categorized the moment it's created.
Practical Examples of Smart Field Mapping
To make this tangible, let’s look at some real-world setups that top-performing sales and RevOps teams use to maintain impeccable data hygiene.
We've compiled some common and high-impact examples in the table below. This shows how you can translate data points from an external tool into valuable, structured information inside Salesforce.
| Add to CRM Data Point | Salesforce Field (Object) | Purpose and Best Practice |
|---|---|---|
Email (Lead, Contact) | Essential. The primary unique identifier for duplicate checks and communication. | |
| Job Title | Title (Lead, Contact) | Standard mapping. Crucial for persona identification and routing. |
| Company Industry | Industry (Account) | Use this to map to your standard Industry picklist for accurate account segmentation and targeted campaigns. |
| Employee Count | NumberOfEmployees (Account) | Capture firmographic data. Can also trigger workflows to populate a custom "Company Size Tier" field. |
| Seniority Level | Level__c (Lead, Contact) | Custom Field Example. Map to a custom picklist to automatically categorize leads for different sales plays. |
| City, State, Country | City, State, Country (Lead, Contact) | Powers geographic segmentation and ensures accurate territory assignment for your sales reps. |
| Social Profile URL | Social_Profile_URL__c (Lead, Contact) | Custom Field Example. A must-have for social selling. Store the URL in a custom field for easy access. |
These mappings aren't just about data entry; they're about building a strategic asset. Each correctly mapped field powers more accurate reporting, smarter lead routing, and highly personalized outreach.
Think of field mapping as creating a GPS for your data. You’re giving every piece of information a precise destination inside Salesforce, eliminating any chance it gets lost or ends up in the wrong place.
Preventing Duplicates Before They Happen
One of the biggest threats to CRM data integrity is the dreaded duplicate record. Duplicates split conversation histories, skew reporting, and create massive confusion for sales reps. Who do you call? Which record has the latest notes?
A modern integration tackles this head-on with built-in duplicate detection. Before creating a new record, the system should automatically check Salesforce for existing Leads or Contacts that match key identifiers, like an email address or a combination of name and company.
This real-time check is a game-changer. If a match is found, the tool alerts the user, stopping a duplicate from ever being created. It’s a simple, automated step that serves as your first line of defense in maintaining a clean database.
This is more important than ever as businesses rely on AI to analyze their sales data. Data integration with Salesforce is no longer just a technical checkbox—it's a direct driver of revenue. When sales managers can instantly create enriched Salesforce records from an email, complete with 31 data points like company revenue and contact seniority, they provide the clean fuel that AI models need.
Tools that combine these duplicate checks with GDPR-compliant data enrichment are an obvious choice for any growth-focused team. For more on this trend, check out the evolving role of CIOs and AI in business on Salesforce News.
With your fields perfectly mapped and your duplicate checks in place, every record that enters your system is clean, complete, and ready for action.
Testing Your Integration and Solving Common Problems
You’ve mapped your fields and configured the settings—you're in the home stretch now. But before you announce this to the whole team, it’s critical to put your setup through its paces.
Think of testing as the final quality check. It’s where you catch the small hiccups before they become massive headaches for your reps. This step is what turns a theoretical configuration into a battle-tested workflow you can actually rely on.
Running a Real-World Test Scenario
The best way to validate everything is to act like a sales rep for a few minutes. Simulate the exact actions your team will be taking day in and day out. This isn’t just about making sure the tech works; it’s about confirming the process feels right.
Start with a simple, direct test. Find a prospect on a professional networking site and use the Add to CRM extension to create a brand-new Lead or Contact in Salesforce. Don't just click "Add" and assume it all went according to plan. Open a new tab and pull up that exact record in your Salesforce org.
Now, it's time for a detailed inspection. Ask yourself a few key questions:
- Did all the mapped fields populate correctly? Check everything. I mean everything—from standard fields like
TitleandCompanyto your must-have custom fields likeLevel__corSocial_Profile_URL__c. - Is the data formatted properly? Make sure picklist values match what you have in Salesforce, phone numbers look right, and any numbers are displaying as you'd expect.
- Was the record assigned to the right owner? Double-check that your lead assignment rules or default user settings kicked in correctly.
- Did the duplicate check do its job? Now, try adding a contact you know for a fact is already in your CRM. The extension should immediately flag the existing record, stopping a duplicate in its tracks.
This hands-on check gives you the confidence that the core mechanics are solid. If everything looks good, you're ready for almost anything.
Troubleshooting Common Integration Errors
Even with the most careful setup, you might hit a snag or two. The good news is that most errors are common and have simple fixes that don't require you to be a Salesforce developer. Knowing what to look for makes solving them a breeze.
Error 1: 'API Access Disabled'
This is, without a doubt, the most frequent issue people run into when connecting a new tool to Salesforce. It simply means the user profile you’re using for the integration doesn’t have permission to talk to Salesforce through its API.
- The Fix: A Salesforce admin needs to pop into Setup, find the user's Profile, and check the "API Enabled" box under System Permissions. This is often turned off by default on certain Salesforce editions or custom profiles to enhance security.
Error 2: Field Validation Rule Failures
Ever see an error message that calls out a specific field? This usually means your Salesforce org has a validation rule that the new data is breaking. For example, you might have a rule that requires the Industry field to be filled out, but your mapping from a prospect profile doesn't include it.
- The Fix: Head over to your validation rules in Salesforce Setup. You have two choices: either adjust the rule to be a bit more forgiving or—the better option—update your field mapping in Add to CRM to make sure you’re always sending the data that Salesforce requires.
Proactively testing for these common errors is a small time investment that pays huge dividends. It ensures a smooth, frustration-free experience when you roll the tool out to your wider team, preventing a flood of support requests.
Ultimately, the whole point of integrating with Salesforce is to make your team more efficient and drive more revenue. The ROI on these kinds of connections is undeniable, with an average return of 299% over three years for Salesforce Marketing Cloud integrations.
With a tool like Add to CRM, admins ensure data stays clean with verified profiles and custom mappings, while SDRs get back over four hours every week. That boost in sales capacity—up to 20%—is what directly fuels your pipeline growth. To see how this breaks down financially, you can explore more about Salesforce data integration ROI on Integrate.io.
Works with 27 CRMs
Add to CRM finds verified emails, phone numbers, and job titles on LinkedIn® — then adds them to your CRM in one click.
Start Free TrialYour Salesforce Integration Questions, Answered
Connecting a new tool to your Salesforce org always brings up a few questions, even for seasoned admins. Let's tackle the most common ones we hear so you can move forward with total confidence.
Does This Work with Any Salesforce Edition?
This is the big one. The short answer is no, because not all Salesforce editions are created equal when it comes to API access.
You'll need Enterprise Edition or higher (like Unlimited or Developer) to make the magic happen. The Professional Edition, a common sticking point for many teams, doesn't include API access by default, which is a non-negotiable for this kind of integration.
How Secure Is the Connection to Our Org?
Your data's security is everything. We use OAuth 2.0, which is the gold standard for secure connections.
This means we never see or store your Salesforce password. Instead, you grant the app permission to perform specific actions—like creating a new lead—using a secure token.
Think of it like a valet key for your car. It lets the application "park the data" (create a record) without giving it the keys to the entire car (your whole Salesforce instance). This keeps your data locked down and protected.
What About Our Custom Fields and Validation Rules?
Your Salesforce setup is unique, and any good integration should respect that.
Our tool is designed from the ground up to handle your custom configuration. It includes robust custom field mapping, allowing you to push data from a prospect's profile directly into any custom field on your Lead, Contact, or Account objects.
And don't worry about your validation rules. The integration honors them completely. If a user tries to save a record that's missing a required field, Salesforce will simply return an error, preventing bad data from ever entering your system. It's all about maintaining the data integrity you've worked so hard to build.
Ready to stop the copy-paste grind and start creating clean Salesforce records in one click? Add to CRM eliminates manual data entry, prevents duplicates, and saves your sales team over four hours every week. Try it for free and see the difference. Get Add to CRM today.
Start saving time and closing more deals.
Find contact info for your prospects on the #1 business social network and add them to your CRM with 1-click.
Trusted by 1000s of founders, SDRs & more